Color Sketches of 3D Images
AJ Shankar, Wing Yung
{aj,wing}@post.harvard.edu

Watercolor style
Color Sketches of 3D Images
AJ Shankar, Wing Yung
{aj,wing}@post.harvard.edu
Watercolor style
Overview
While we can always strive for realism in 3D rendering with new lighting
models and materials, non-photorealistic rendering has its merits as well. A
realistic 3D renderer requires complex models and textures as well as a great
deal of time and attention given to detail, and often results in an obviously
computer-generated image, which is not always appealing. By tailoring our NPR renderer to mimic human drawing
(in a variety of styles) we allow animators to utilize the automated features
of computer animation while still producing a very human image or video.
Unlike traditional sketch renderers (like some Photoshop filters), our renderer uses 3D information to better perform edge detection and coloration. For any given frame, it needs only the normal rendered image of that frame, and its associated depth map (z-buffer). Because it needs a limited amount of information, found universally in 3D renderers, the sketch renderer can be plugged into nearly any 3D rendering mechanism, from povray to OpenGL.
The sketch renderer uses a stochastic process, dependent on several variables, to construct the sketch. By varying parameters like the average width and length of lines, the user can create different drawing styles.
We attached our sketch renderer to the framework of the CS275 keyframer. It takes a keyframe animation and renders its frames in the desired style, outputting to targa files that can be composed into a movie by third-party software.
Algorithm
 Our project
was inspired by a short "paper" by Cassidy on "Sketchy Animation."
The basic idea is to find edges, select points on those edges, and start drawing
short lines along the edges. This is done for a user-defined number of points.
Our project
was inspired by a short "paper" by Cassidy on "Sketchy Animation."
The basic idea is to find edges, select points on those edges, and start drawing
short lines along the edges. This is done for a user-defined number of points.
We start with a depth map (right), which tells us the distance to the nearest object at every pixel in the image. Edges are located by computing the gradient of the depth map: the gradient is largest at discontinuities in depth, which is where the edges are. If the magnitude of the gradient at a certain point is greater than an adjustable threshold, the point is stored. The directions of the gradient are stored as unit vectors.
Once all of the gradient magnitudes have been checked, the result is an image with all of the calculated edges (below, right). Every pixel in this image is either 0 or 1. This will give us some idea of where to pick our line-starting pixels. Before proceeding, however, we diffuse the image to introduce pixel values between 0 and 1. This ensures that a small portion of the picked pixels will be slightly off the edges; the imperfection contributes to the hand-drawn look of the resulting image.
After diffusing, we pick a pixel on the
edge-image at random, with the probability that a given pixel is picked weighted
by its value. We anchor the picked pixel as the start of a series of line segments.
 We imagine a
particle starting at that pixel and being pushed along the image perpendicular
to the gradient at that point, which will be along an edge. We also introduce
a random jitter to push the particle slightly off path. When a particle wanders
too far off the path, we draw it and start over. We also introduce a "forgiveness"
mechanism: if a particle leaves the path but then comes back on less than a
set number of segments, we forgive it and continue. The distance traveled per
segment, degree of randomness, and number of segments are all adjustable.
We imagine a
particle starting at that pixel and being pushed along the image perpendicular
to the gradient at that point, which will be along an edge. We also introduce
a random jitter to push the particle slightly off path. When a particle wanders
too far off the path, we draw it and start over. We also introduce a "forgiveness"
mechanism: if a particle leaves the path but then comes back on less than a
set number of segments, we forgive it and continue. The distance traveled per
segment, degree of randomness, and number of segments are all adjustable.
We continue the process for a set ratio of pixels. The result is a series of line segments that follow along edges, but not perfectly: a hand-drawn image.
One significant difference between our method and previous 3D-based sketch renderers is that we produce color sketches; previously, sketches were generally black-and-white or grayscale. A naive approach to drawing color sketches is to select the color of a series of line segments in the algorithm above by simply looking at the color of the actual rendered image at the starting pixel. However, because of the diffusion and randomness of selection, segments often follow the edge of one object, but start outside that object, and so picking colors in this fashion results in incorrectly colored edges. To provide more accurate coloring, we make the obvious observation that any given edge is formed by an object closer to the camera than its surroundings. So we put the depth map to good use again by looking at a 25-pixel neighborhood of the selected pixel, finding the one that is closest to the eye, and selecting its color. This provides markedly better results, although in cases of high randomness discolorations still occur.
User-Modifiable Settings
In addition to creating the color-picking algorithm, we also increase the
number of user-set variables over previous sketch implementation. The sketch
settings that can be modified by the user are:
Tweaking these variables allowing for a significant range of output styles.
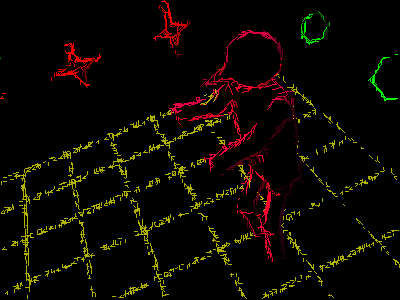
Results
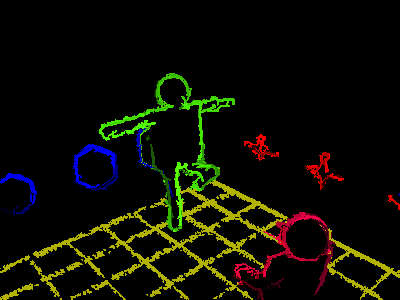
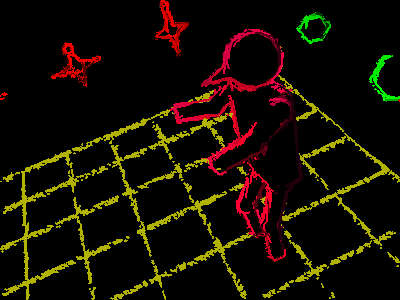
Our GL animator produces frames that look like this:

By modifying the sketch settings, we were able to produce images in a variety of styles. Unlike Cassidy's algorithm, which took 10-60 seconds to produce a sketch (on unspecified hardware), our renderer produces images in 1-2 seconds on a Pentium II 450.
|
|
|
Hatch |

Lines |

Points |
|

Watercolor |
Watercolor |
Animations
We created animations featuring these styles. Unfortunately they had to be heavily
compressed (the largest was composed of over a gig of source images) and so
image quality is somewhat lacking.
You need the DivX codec to play the files (Windows codec; others readily available online). You might want to right-click and Save As if your browser is having trouble displaying AVIs.
If you have a fast connection, we strongly urge you to download Robot Fighters 2 (16 MB), our (laboriously constructed) two-minute epic battle of Red vs. Green. Robot Fighters 1 is, of course, Wing's brilliant CS275 animation. RF2 was rendered using the default sketch settings.
We also have a much shorter clip from RF2 (2 MB), a thin lines animation (744k, looks like ballpoint pen), and several others we can produce on demand (just email us).
Bugs
Our color picker is not perfect; optimally, it would vary its neighborhood range
based on the randomness setting. Right now, high randomness leads to incorrect
coloration.
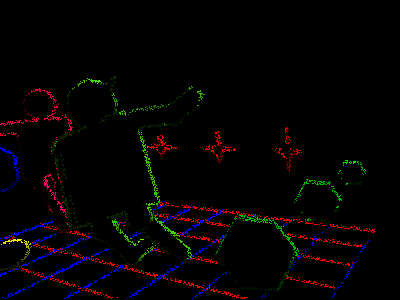
Our biggest bug occurs when the eye is
very close to an object. Due to a lack of precision in the depth map datatype,
when our algorithm normalizes the gradient it ends up "determining"
that large portions of the object's surface are edges, and selects from them,
resulting in images like this:
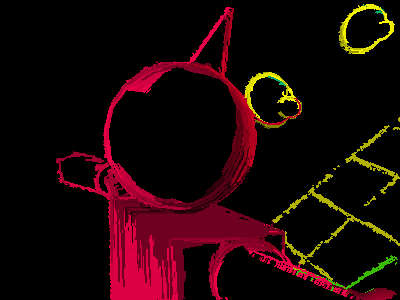
We are not sure how to resolve this; our fear is that GL's native depth map
representation lacks the necessary precision. (Btw, if you look closely at the
above image you can also see some coloring errors.)
Final Words
Because it requires only limited 3D information, our sketch animator can be
used in nearly any 3D rendering system. Its wealth of customizable settings
allow for a variety of outputs. It represents a real attempt at coloring 3D
sketches, and while there are some imperfections, we feel that the overall output
is very good for stills and satisfactory for animation purposes.
Please email us your comments at aj@post.harvard.edu and wing@post.harvard.edu. We have also worked together in the past; see Image Inpainting and gNarLI.